Frequently Asked Questions
INSTALLATION
1 Log into your account on this site.
2 Navigate to the Files tab on your account and click the installation file to download it to your hard drive.
3 Open Sketchup
4 Click Extensions/Extension Manager in Sketchup
5 Click 'Install Extension'
6 Navigate to the downloaded installation file and select it (usually in your Downloads folder)
7 Click the gear icon and set your Loading Policy to 'Unrestricted' or 'Approve Unidentified Extensions'
8 On the extension list click 'Enable' by the plugin
9 Shut down and restart Sketchup
Please see the installation instructions on the Tutorials page for additional information.
Signing was introduced by Sketchup in Su2016 but it is unnecessary for the function of my extensions. You need only to click 'ENABLED' in extension manager. (Depending on your version of Sketchup you may instead need to set your extension policy to 'Unrestricted' or 'Approve Unidentified Extensions'). Please see the installation instructions on the Tutorials page for more information.
I provide multiple copies of the download file in your account so that you can obtaining updates and for installing on other computers. If you have reached the limit but need more copies, send me an email and I will increase the limit. But please only click the file ONE time when you need a new copy. Do NOT click the download file multiple times. (There should be an error message to try to stop you from doing so)
UPDATES AND COMPATIBILITY
My plugins are compatible with all versions of Sketchup and current Mac or Windows operating systems. When you install a new version of Sketchup, it is important to download and install from the Files tab on your account to make sure you have the compatible version.
I revise my plugins to make them compatible with new versions of Sketchup or to add functionality. Current versions are on the Files tab on your account. The extension version is shown under 'About' on the extensions menu and displayed at the bottom of the Sketchup window as shown below. The current version numbers are also shown on the 'Your Account' page. 
GENERAL
My extensions use Google Translate; so they may not be entirely accurate. A shown below, first choose the language to translate the menu into. Then turn it on or off.![]()
Multiple licenses work like a roving license. All licenses for each plugin are included in a single download file that gets installed on all computers. Computers are associated with licenses on a first come first serve basis. Once all licenses are associated, if a different computer attempts to use the plugin, a message will pop up telling you to log on to your account and click 'Reactivate'. This frees up all the licenses which are again associated with machines on a first come first served basis. Should you add licenses at a later date, it is necessary to download and install again on all your computers.
Styles are simply saved sets of parameters. I've included preset styles as examples or starting points to help users to create and save their own styles. I recommend the following technique:
1. Start with a style that is closest to the result you want, create a new name for it, and run the plugin.
2. Change a parameter or 2 as necessary to get closer to what you want, give the syle another new name and run the plugin again.
3. Continue making tests until you get what you want. then purge the intermediate test styles and the unused objects created.
My plugins automtatically use whatever units you have set in Sketchup under 'Window / Model Info'.
My plugins make a selection list of whatever materials you have loaded into your model. There are several ways to load materials into your model. The easiest way is to paint a material on some object in your model. If you are interested in my custom material textures, click Load Materials under the particular extension, such as for Instant Roof, click 'Extensions/Vali Architects/Instant RoofNui/Load Vali Architects Roof Materials'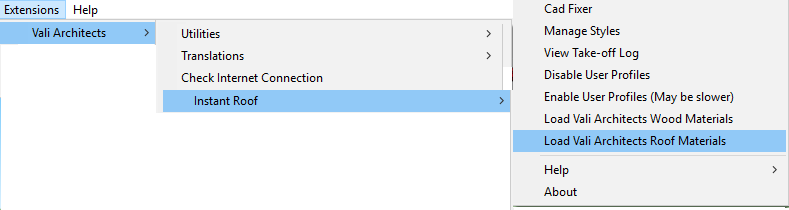
This can happen if there are any non ascii characters in the plugins path such as your name. For example,on my windows machine the path should be similar to: 'C:\Users\chuck\AppData\Roaming\SketchUp\SketchUp 2018\SketchUp\Plugins' (substitute your user name) If you have any non-standard characters, please change the folders or user name or this will break the icon menu.
The license is set to the media access card number that your computer reports. This can vary on a single computer if you change how you connect to the internet or if you use a vpn. Unfortunately there is no workaround other than bookmarking my website and staying logged in. In which case it should take a few seconds to reactivate. (There is no security danger because my site has no personal information - only your username and email address).
Click Extensions/Vali Architects/Check Internet Connection. If the answer is 'No Connection!', verify that your machine has an internet connection and your firewall and Internet Explorer are not blocking SketchUp or suscripts.com. Try setting Internet Explorer security level to Medium.
Instant CLADDING
You must select the door and windows in addition to the wall face for the plugin to cut around them.
Instant DOOR and WINDOW
You must set the back and front component depths so they make up the total wall thickness. (Depending on the frame type selected, they can also overlap)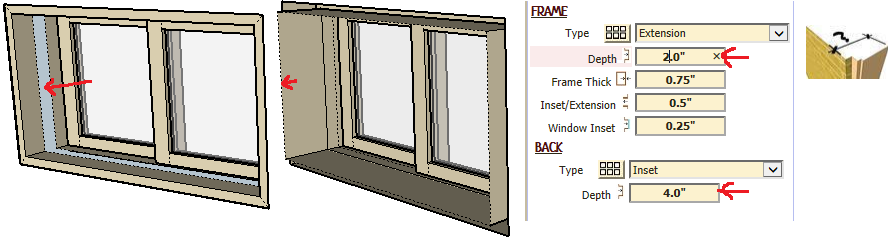
You can also have the plugin determine the back frame depth for you by choosing 'By Overall Wall Thickness' or 'By Wall Selection' for the 'Back Frame Depth' parameter.
Your wall face must be active for hole cutting to occur. If your wall face is in a group, double click it to make the face active for editing.(This is requirement of Sketchup's built-in component face cutting behavior)
instant FENCE
There is a limit to the number of posts (many thousands) to prevent the user from accidentally setting up a task that might take hours for the their computer to run. If you need to make a fence longer than the limit allows, make it in multiple lengths.
The plugin does not make T or X intersections. If you need to do so, you can run the plugin multiple times. If you are dropping to terrain, hide the fence / railing you have already made before making the next intersecting section.
You can run the same input curve more than one time to add or combine different features that can not be made with a single run of the plugin. First Edit/Copy the input curve, run the plugin, Edit/Paste in Place and run the plugin again with different paramters. Then erase any extra features if necessary.
Instant ROAD
Your outline has too many segments. If you give the road plugin a lot of calculations, such as a very large or highly detailed road outline, or an overly triangulated terrain, the plugin can take a very long time. Possibly many hours - during which Sketchup will be unresponsive. If it finds an error in your setup you will have wasted that time. So you should test your outline first by making a simplified version using the included simplifier tool and a simplified terrain mesh.
The plugin merges the outside of the road with your terrain mesh at the shoulder width parameter distance. If any point in the shoulder width offset distance the plugin does not find part of your terrain mesh it will output this error. If you are certain that there is way more room than necessary on your terrain mesh, then you have likely moved or copied your input group. Do not copy, move, rotate or scale your input outline group. Either make your outline group in place, or if you must move it, explode the group and regroup it in its final location.
You must unlock a Geo-Located terrain to use with my plugins.
The plugin tries to smooth bumps in the road surface. If you have a bumpy terrain mesh, turn on the 'Flatten' parameter and try a longer value. If you have long road sections- especially on a steep terrain like the image below, turn on the 'Divide' parameter and try a smaller value. (Avoid using too small value as this will take a long time to run)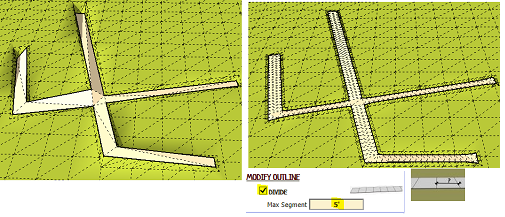
Yes but the plugin can not do this for you. Set the 'Drop to Terrain' parameter to 'no' and enter callout elevations (or set the grades of your input curve when using Road from Center Line). The plugin can't do it for you because there will generally either be no solution (such as your terrain is too steep) or an infinite number of solutions.
instant ROOF
If you use imported cad this will cause Skethup to not complete the roof or worse - to crash. You should either draw your outline without snapping to any imported cad (Sketchup always tries to snap) or use a fixed version of your outline using the included cad fixer tool.
Think of cad like a disease that gets transmitted to the next object any time it touches it. The new object created is now contaminated and passes the disease on. It does not get cured until cad fixed and quarantened. The cad fixer puts it in a group to keep it separated. If you explode the group before making the roof it gets diseased again.
The plugin models the exterior skin. There is no standard relationship between the exterior skin and interior ceiling height. So you must be able to determine the height where your exterior wall face intersects the eave and make your face at that height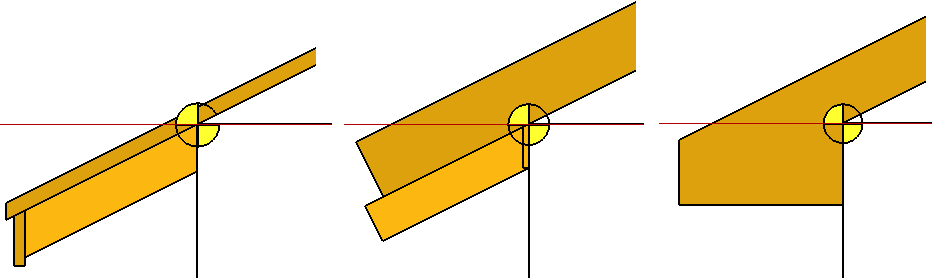
The plugin models the roof such that the underside of eave is at the edge of the horizontal face selected for input. It does have any information such as wall surfaces and structural bearing condition necessary to adjust that height for you. Nor is it intended only for wood framed buildings. Set the input face at the height where your exterior wall face intersects the eave as shown here:
instant SITE GRADER
The plugin looks for vertical faces in the input group. If if finds a vertical face it switches to the object method. If you are intending to use the loop method but the plugin displays the object method, there is at least one vertical face in your input group. (If you don't see any then the face(s) may be very small)
The plugin checks the slope at each vertex in your outline. If you have more vertices in your outline it will be more accurate because there will be more terrain checks. For example, the simple rectangle shown below on the left only calculates a slope at 4 locations, so it is not as accurate as the one on the right where I broke the rectangle edges into several segments.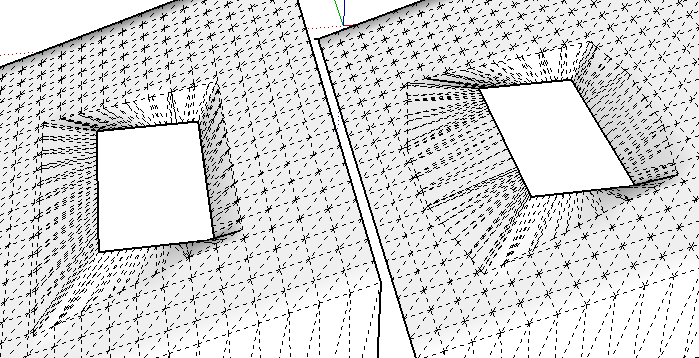
The terrain mesh must be active. If it is in a group, either explode the group or double click it to open it and make your outline within that group.
You must unlock a Geo-Located terrain to use with my plugins.
instant TERRAIN
If you give the terrain plugin a lot of calculations, such as an very large overly triangulated terrain or if you set a very high number of grids / small grid spacing, the plugin can take a very long time during which Sketchup will be unresponsive.
instant WALL
Pilasters are placed at every break in the input curve and at additional locations if the 'Shorten Segments' parameter is selected.
If there are extra pilasters, simply erase them as shown below.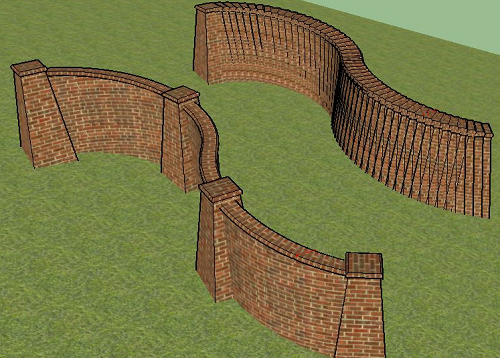
Instant Wall ignores hidden geometry when using drop to terrain feature. This is useful for making wall intersections for example. You can make one wall; hide it; make the intersecting wall; then unhide the first one. The result will be an intersection rather than one wall climbing over the other one.When you use "Hide rest of model" mode, the objects aren't actually turned into hidden objects. Then just aren't displayed. You need to actually hide the objects using Edit/Hide.

